Configure Spring Webflow 2 with jsp views
Spring, Spring Webflow ·This tutorial explains how to configure Spring Webflow 2, showing how it integrates with the view layer, in this case, JSP pages. The web application will allow two different types of request, flow executions and requests to Spring Web MVC. When a request comes in, it will try to find a flow. If not successful, it will try to map the request to an MVC handler.
Environment
Spring 3.0.5.RELEASE
Webflow 2.3.1.RELEASE
Tomcat 6.0
Maven 2
Getting all needed files
First of all you need to import the Spring libraries to your project. Using Maven 2, you just need to add the following dependencies:
<properties>
      <org.spring.version>3.0.5.RELEASE</org.spring.version>
      <webflow.version>2.3.1.RELEASE</webflow.version>
  </properties>


  <dependencies>
    <!-- Spring -->
    <dependency>
      <groupId>org.springframework</groupId>
      <artifactId>spring-core</artifactId>
      <version>${org.spring.version}</version>
    </dependency>
    <dependency>
      <groupId>org.springframework</groupId>
      <artifactId>spring-expression</artifactId>
      <version>${org.spring.version}</version>
    </dependency>
    <dependency>
      <groupId>org.springframework</groupId>
      <artifactId>spring-beans</artifactId>
      <version>${org.spring.version}</version>
    </dependency>
    <dependency>
      <groupId>org.springframework</groupId>
      <artifactId>spring-aop</artifactId>
      <version>${org.spring.version}</version>
    </dependency>
    <dependency>
      <groupId>org.springframework</groupId>
      <artifactId>spring-context</artifactId>
      <version>${org.spring.version}</version>
    </dependency>
    <dependency>
      <groupId>org.springframework</groupId>
      <artifactId>spring-web</artifactId>
      <version>${org.spring.version}</version>
    </dependency>
    <dependency>
      <groupId>org.springframework</groupId>
      <artifactId>spring-webmvc</artifactId>
      <version>${org.spring.version}</version>
    </dependency>

    <!-- Spring Webflow -->
    <dependency>
      <groupId>org.springframework.webflow</groupId>
      <artifactId>spring-webflow</artifactId>
      <version>${webflow.version}</version>
    </dependency>
  </dependencies>
Configuring Spring
I’ve divided the configuration, which consists in Spring configuration and integration with webflow, into three files, which are the following:
- root-context.xml: The parent context, loaded by the Spring listener. This file contains back end configuration like repositories or business services. This tutorial is quite simple and I just pretend to explain how to configure Webflow, so this file will be empty.
- app-context.xml: The child context which extends the root context. This context contains the web layer configuration like view resolvers, beans and controllers.
- webflow-config.xml: This file configures webflow and it will be imported by the application context (app-context.xml). It could go inside the application context file but I keep it separate because I prefer to have the configuration structured.
The content of the above files is described below:
<?xml version="1.0"encoding="UTF-8"?>
<beans xmlns=http://www.springframework.org/schema/beans
      xmlns:xsi=http://www.w3.org/2001/XMLSchema-instance
      xmlns:mvc=http://www.springframework.org/schema/mvc
      xmlns:context=http://www.springframework.org/schema/context
      xsi:schemaLocation="
            http://www.springframework.org/schema/beans
            http://www.springframework.org/schema/beans/spring-beans-3.0.xsd
            http://www.springframework.org/schema/context
            http://www.springframework.org/schema/context/spring-context-3.0.xsd
            http://www.springframework.org/schema/mvc
            http://www.springframework.org/schema/mvc/spring-mvc-3.0.xsd">

      <import resource="webflow-config.xml"/>

      <!-- Detects mvc annotations like @RequestMapping -->
      <mvc:annotation-driven/>

      <!-- Detects @Component, @Service, @Controller, @Repository, @Configuration -->
      <context:component-scan base-package="org.spring.tutorial.controller"/>


      <bean class="org.springframework.web.servlet.view.InternalResourceViewResolver">
            <property name="prefix"value="/WEB-INF/views/"/>
            <property name="suffix"value=".jsp"/>
      </bean>
</beans>
I haven’t included any controller definition because I prefer to use annotations. The component-scan tag will be responsible of scanning the base package to look for classes annotated with @Component and @Controller among others. In this tutorial I’ve annotated my controllers with @Controller annotation. You should keep in mind that component-scan tag will also search the classpath, so it is not recommended to set the base-package with values like “com” or “org”.
The view resolver is used by Spring Web MVC requests, and is responsible of resolving view logic names returned by the MVC controllers.
Configuring Webflow
<?xml version="1.0"encoding="UTF-8"?>
<beans xmlns=http://www.springframework.org/schema/beans
      xmlns:xsi=http://www.w3.org/2001/XMLSchema-instance
      xmlns:webflow=http://www.springframework.org/schema/webflow-config
      xsi:schemaLocation="
            http://www.springframework.org/schema/beans
            http://www.springframework.org/schema/beans/spring-beans-3.0.xsd
            http://www.springframework.org/schema/webflow-config
        http://www.springframework.org/schema/webflow-config/spring-webflow-config-2.0.xsd">

      <bean class="org.springframework.webflow.scope.ScopeRegistrar"/>

      <!-- Spring Webflow central configuration component -->
      <webflow:flow-executor id="flowExecutor"flow-registry="flowRegistry"/>

      <webflow:flow-registry id="flowRegistry">
          <webflow:flow-location path="/WEB-INF/flows/main/main.xml"/>
          <!-- Could use a pattern instead
          <webflow:flow-location-pattern value="/**/*-flow.xml"/>
          -->
      </webflow:flow-registry>

      <bean class="org.springframework.webflow.mvc.servlet.FlowHandlerAdapter">
          <property name="flowExecutor"ref="flowExecutor" />
      </bean>

      <bean class="org.springframework.webflow.mvc.servlet.FlowHandlerMapping">
          <property name="flowRegistry"ref="flowRegistry"/>
          <property name="order"value="0"/>
      </bean>
</beans>
ScopeRegistar: Registers webflow scopes. This allows you to use them in addition to the usual Spring scopes. These scopes are flash, view, flow and conversation.
Flow registry: Registers all the flows that will be used in the web application. It is required to specify where is every flow definition located, which means the xml file. In this tutorial, we specify the exact location of the file with the flow-location property, but you could instead specify a pattern.
FlowHandlerAdapter: Activates the flow management with Spring MVC.
Configuring the webapp
The web.xml is as follows:
<!-- root context configuration -->
  <context-param>
      <param-name>contextConfigLocation</param-name>
      <param-value>/WEB-INF/config/root-context.xml</param-value>
  </context-param>

  <!-- Loads the root context into the servletContext before any servlets are initialized -->
  <listener>
      <listener-class>org.springframework.web.context.ContextLoaderListener</listener-class>
  </listener>

  <!-- Spring servlet -->
  <servlet>
      <servlet-name>springServlet</servlet-name>
      <servlet-class>org.springframework.web.servlet.DispatcherServlet</servlet-class>
      <init-param>
            <param-name>contextConfigLocation</param-name>
            <param-value>/WEB-INF/config/app-context.xml</param-value>
      </init-param>
  </servlet>
  <servlet-mapping>
      <servlet-name>springServlet</servlet-name>
      <url-pattern>/spring/*</url-pattern>
  </servlet-mapping>
Implementing MVC handler
The MVC mapping is configured with annotations (@RequestMapping).
import org.springframework.stereotype.Controller;
import org.springframework.ui.Model;
import org.springframework.web.bind.annotation.RequestMapping;

@Controller
public class MvcController {

      @RequestMapping("/viewMvc")
      public String getData(Model model) {
            model.addAttribute("message", "Hello world MVC");
            return "mvcView";
      }
}
Building the flow
The flow is really simple. It consists of an initial view which takes an input field, a navigation to an action state which will build the message, and a final view where the message will be shown.
This flow must be defined in the flow registry in order to be found. We did this in the webflow-config.xml. The following is the detail of the main.xml file:
<view-state id="startPage">
            <transition on="next"to="setMessage"/>
      </view-state>

      <action-state id="setMessage">
            <evaluate expression="setMessageController"/>
            <transition on="ok"to="finalView"/>
      </action-state>

      <end-state id="finalView" view="finalView.jsp"/>
The initial view (startPage) is composed of a form and a submit button which will take us to the next state. It is not necessary to specify the ‘view’ attribute if the physical view name is the same as the id of the view-state.
<form method="post">

            Enter your name: <inputtype="text" name="inputName"value=""/>
            <input type="hidden"name="_flowExecutionKey" value="${flowExecutionKey}"/>
            <input type="submit"class="button" name="_eventId_next"value="Next view"/>
      </form>
You need to send a request parameter named ‘flowExecutionKey’ when you submit the form. This way, when a request comes in with this parameter, Webflow will be able to resume the current flow execution and navigate to the next state.
Specifying “_eventId_next” as the name attribute on the component that executes the action, will launch the event “next”, which will execute the transition to the next state defined in the flow definition. You could also do this with a hidden field:
<input type="hidden"name="_eventId" value="next"/>
import org.springframework.stereotype.Controller;
import org.springframework.webflow.execution.Action;
import org.springframework.webflow.execution.Event;
import org.springframework.webflow.execution.RequestContext;

@Controller("setMessageController")
public classWebflowController implements Action {

      @Override
      public Event execute(RequestContext req) throws Exception {
            String name = req.getRequestParameters().get("inputName");
            req.getFlowScope().put("message", "Hello "+name);
            return new Event(this, "ok");
      }
}
Accessing the webapp
http://localhost:8080/myWebapp/spring/viewMvc
This url will be handled by Spring Webflow and will start the main flow:
Project structure
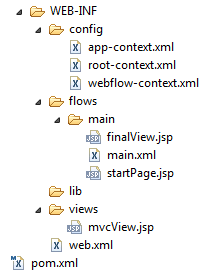
As specified in the flow registry, flows are located in the WEB-INF/flows/ folder. The main folder contains the flow definition and the views associated to the flow.
The views folder contains MVC views. The location is specified at the view resolver.
Related posts